Come And Get It!

ltiztaz's Blog

My recipe for THE Perfect Pizza!  Fresh, hot, delicious,  mouthwatering pizza.  Fresh, Homemade dough. Fresh, flavor packed sauce. The perfect pizza tonight! The Perfect Pizza!
Now I know you all have different tastes and opinions when it comes to pizzas. Pepperoni, Sausage, Ham, Pineapple, Peppers, Onions, etc. . We all love pizza whatever form it comes in. I married into pizza. My husband ran 16 pizza stores then we owned a few but, we’ve never got away from the pizza biz. People have always asked me, “Don’t you every get tired of pizza?” WHAT??? Blasphemy I say! I cannot go a week without my pizza fix. I neeeeeeeed my pizza. I’m a pizzaholic. (Heavy sigh) Yes I’m an addict. Yet, I have no intention of going to PAA (Pizza Addicts Anonymous). In stead I feed my addiction. I’ve ordered from every pizza delivery place out they’re I think. Unfortunately I also have hundreds of horror stories about those pizza’s. Nightmares I tell you nightmares. Hundreds of hours of therapy later I decided…

View original post 460 more words

Come And Get It!

    My recipe for THE Perfect Pizza!  Fresh, hot, delicious,  mouthwatering pizza.  Fresh, Homemade dough. Fresh, flavor packed sauce. The perfect pizza tonight!
    The Perfect Pizza!
    Now I know you all have different tastes and opinions when it comes to pizzas. Pepperoni, Sausage, Ham, Pineapple, Peppers, Onions, etc. . We all love pizza whatever form it comes in. I married into pizza. My husband ran 16 pizza stores then we owned a few but, we’ve never got away from the pizza biz. People have always asked me, “Don’t you every get tired of pizza?” WHAT??? Blasphemy I say! I cannot go a week without my pizza fix. I neeeeeeeed my pizza. I’m a pizzaholic. (Heavy sigh) Yes I’m an addict. Yet, I have no intention of going to PAA (Pizza Addicts Anonymous). Instead I feed my addiction. I’ve ordered from every pizza delivery place out there I think. Unfortunately I also have hundreds of horror stories about those pizza’s. Nightmares, I tell you, nightmares!! Hundreds of hours of therapy later I decided my only cure was to make my own pizza. After all who better than a pizza addict to know how it should taste? So, I’ve spent hours coming up with the perfect pizza dough. Hate delivery pizza like me? Tired of pizza that tastes like the cardboard box it came in? Sick of cold, rubbery, no toppings or cheese pizza? Then, I’ve got the answer for you. My Perfect Pizza Recipe! Try it, you’ll love it! Guaranteed! (Sorry no refunds)
    Perfect Pizza Dough
    1 1/4 cups warm water
    Not hot 120-130°
    1 envelope (.25 oz) active quick rise dry yeast
    2 tsp. Sugar
    1 Tbl. Olive Oil
    1 1/2 tsp. Salt
    3 1/2 cups AP Flour
    2 tsp. Corn meal
    Place 1/2 cup warm water, sugar and yeast in a large bowl. Let stand 8 minutes until yeast dissolves and “blooms”
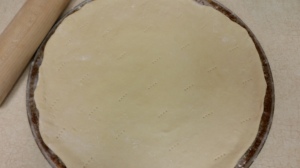
    Add remaining water, salt and oil. Gradually stir in flour 1/2 cup at a time stirring until blended between batches of flour. When dough starts pulling away from sides of bowl turn the dough onto a floured surface. Knead dough until smooth and elastic adding flour if it gets too sticky. Coat a large bowl with cooking spray or grease with oil by hand. Put dough ball into greased bowl and then turn it over so both sides are greased. Cover with a clean towel or plastic wrap. Let rise until double in size. Push dough down and divide into 2 dough balls. Preheat oven to 450°. Roll each dough ball into circle about 1/4″ thick with rolling pin. Coat 2 Pizza Pans or cookie Sheets with cooking spray or oil. Sprinkle pans with cornmeal. Transfer dough to pans by placing rolling pin in center of dough and fold dough in half over pin. Pick up dough and pin and place on pan or sheet. Unroll from pin and spread flat. Repeat with 2nd dough and 2nd pan. Using a fork poke holes all over both pizza doughs to prevent bubbles.
    Perfect Pizza Sauce:
    2 Tbl. Dried Garlic Powder
    2 Tbl. Dried Onion Powder
    1/2 tsp. Pepper flakes
    2 Tbl. Dried Parsley
    1/2 tsp. Dried Sage
    4 tsp. Dried Oregano
    2 tsp. Dried Basil
    1/4 tsp. Salt
    1/2 tsp. Black Pepper
    1 tsp. Sugar
    8 oz. Petite diced tomatoes
    16 oz. Tomato Sauce
    6 oz. Tomato Paste
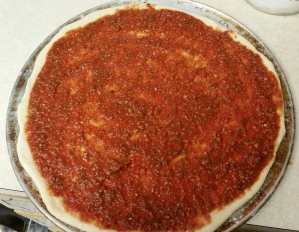
    Blend and crush until sauce is slightly chunky. Using a large spoon put 1/2 the sauce on 1st pizza dough. Using the back of the large spoon spread the pizza sauce evenly around pizza dough but, leave 1/2″ of dough bare around edge of pizza. (See picture below).
    Perfect Pizza Toppings:
    Pepperoni
    Ham
    Bacon
    Sausage
    Onion
    Olives
    Bell Peppers
    Roasted Peppers
    Fresh Garlic (my personal fave)
    Sliced Mushrooms
    Fresh Basil (yummmm)
    Sliced Tomatoes
    Cheddar Cheese
    Mozzarella Cheese
    Colby Jack
    Pepper Jack (me, me, me)
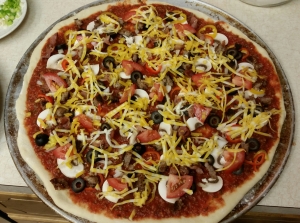
    Put as many toppings as you like but keep each topping scattered around so you don’t get too many. Too many toppings keeps the pizza from cooking in the middle. However you love your pizza topped you’ll have the best pizza ever! Fresh, Hot, Mouthwatering, Pizza Bliss!! (Now I need my pizza fix!) Let me know how you love to top your pizza. I love to hear about new combinations! Enjoy!

    Perfect Pizza needs holes to keep from bubbling!
    Perfect Pizza needs holes to keep from bubbling!
    Perfect Pizza Sauce!
    Perfect Pizza Sauce!
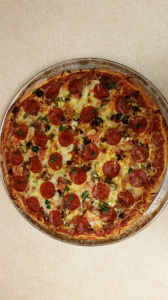
    My fave toppings: Mushrooms, Peppers, Black Olives,  Scallions, Bacon,  Sausage,  Tomatoes,  Pepper Jack Cheese and, of course, Mozzarella! Hold your horses! Where's the Pepperoni?
    My fave toppings: Mushrooms, Peppers, Black Olives, Scallions, Bacon, Sausage, Tomatoes, Pepper Jack Cheese and, of course, Mozzarella! Hold your horses! Where’s the Pepperoni?
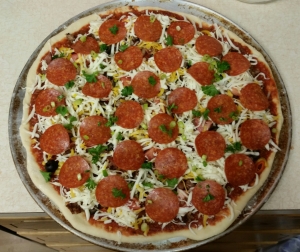
    Phew!  There it is!  If you love your Pepperoni with crispy edges (heeaaven) then place them on the very top of the toppings and cheeses. Then I sprinkle a little Parsley on top. You know, it freshens your breath after you eat the onions, garlic and pepperoni...Not!! Just like the fresh herbs.
    Phew! There it is! If you love your Pepperoni with crispy edges (heeaaven) then place them on the very top of the toppings and cheeses. Then I sprinkle a little Parsley on top. You know, it freshens your breath after you eat the onions, garlic and pepperoni…Not!! I just like the fresh herbs.

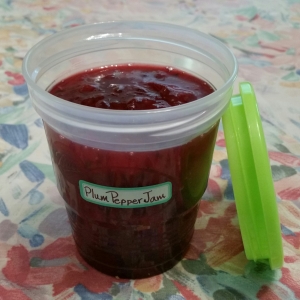
Come And Get It Plum Jam!

Thanksgiving Plum Chutney and Plum Jam variations recipe
Thanksgiving’ s coming soon and have I got an amazing Plum Chutney Jam that’ll replace the cranberry sauce on my family’s table from now on. Then, the day after, we enjoy the Plum Chutney Jam with Turkey Curry Haystack ‘ s (recipe coming soon). I made and then gave samples of my Plum Chutney Jam to friends and neighbors and the reviews were unanimous; “It’s amazing! We can’t get enough of it! Can I put my order in for Thanksgiving?” Then I did the same with the Plum Pepper Jam. “That Plum Pepper Jam is through the roof! The spicy with the sweet is fantastic! I need more! ” With those kind of reviews how could I not share my recipe? Here’s how I got started:
When I moved into my new home this summer I was delighted and scared to find I had fruit trees in my back yard. I remember canning with my mom when I was little bit had never tried it on my own. I decided I didn’t want rotten plums all over my yard so I created a recipe I could use to make different kinds of plum jam. The recipe is easy and does not require pectin to thicken it. This is a freezer jam so it’s extremely user friendly because you just pop it in the freezer and enjoy when you have a hankering for jam. The Plum Chutney version of this jam has become my replacement for cranberry sauce at Thanksgiving! I’ll list some ways to use them and I’ve created a couple of recipes to go with the jams. I’m writing it in a step by step form so beginners can feel confident about trying it out themselves like I did.
Step 1:
3 pounds of plums
Tools needed:
A small paring knife
A Melon baller or a teaspoon
Cutting board
Large plastic or glass bowl
(Don’t use metal because it reacts to the acid in the lemon juice.)
Soft wash cloth
Wash the plums well. You’ll need to wipe the white film off the plums with a soft, wet cloth first. Next take your first plum and using a paring knife you’re going to cut all the way around the plum. Start at the top and you’re going to cut along the natural line going around the plum until you are back in the same spot on top again. Take a hold on each side of the plum next to where you cut. Gently twist and pull apart. On one side you will have a pit. On the other side, no pit! Using the small Melon ball side or the tip of a teaspoon dig directly around the pit and then under the pit. Get as close to the pit as you can. Remove the pit and discard it. Next, using your paring knife, your going to cut 2 “V” notches. Look at the top of each side of the plum where the stem was. Your going to cut a small notch where the top is removing the “bellybutton” of the plum as my grandbabies call it. This gets rid of any left over stem or crusties so it doesn’t go in your jam. No one wants crusties in their jam for sure! Next you will take one half of the plum and slice 1/4″ slices going from top to bottom. Now slice the other half the same way. Place slices into your large plastic/glass bowl. Great job! Now you only have to do the same thing to the remainder of your plums. Slice, twist, pit, notch and slice into slices until all your plums are sliced and in your bowl.
Tools:
Large Stock Pot or 2 medium sauce pans or large fry pans.
Wooden spoon or silicone spatula
Step 2:
Ingredients:
3 cups White Sugar
2 Tablespoons (Tbl.)
Lemon juice, fresh or reconstituted
2 Tbl. Dried Grated Lemon Peel
Sprinkle the sugar, lemon juice and lemon peel over sliced plums. Using a large sturdy spoon mix the ingredients together until all the plums are coated completely. Cover bowl in plastic wrap and let it sit at room temperature for 1 1/2 hours.
After the mixture has sat for 1 1/2 hrs. you’ll notice that there is juice in the bottom of the bowl. (OK time to learn a cool cooking term) Putting sugar over fruit and letting it sit for a while is called Maceration. This process draws out the juice in the fruit and creates a really yummy syrup in the process. Mix the fruit and juices again scraping the sugar from the bottom and pour all the ingredients into a stock pot. If you don’t have a stock pot I also used 2 large sauce pans or frying pans. If you used 2 pans just divide mixture equally so all the sugar on the bottom doesn’t get in 1 pan. Place pan/pans on stove top and cook on high heat. While you wait for the mixture to boil you need to stir constantly with a wooden spoon or silicone spatula. When the mixture begins to boil allow the mixture to get to a rolling boil. This means that as it boils you see more and more bubbles until the bubbles look like they’re moving and rolling all over the mixture (referred to as Jam from here on out). Once your Jam is at a rolling boil lower your heat to low. Adjust it for your stove so it boils on a low boil constantly. You will only stir your Jam occasionally from now on. Wash and dry your plastic/glass bowl while Jam is cooking, you will need it later. While your Jam is boiling get a glass or ceramic salad or small plate and place it in your freezer. This is essential and needs to be frozen by the time your Jam is ready to test. Let your Jam boil for about 30-35 minutes. Jam will look a bit thicker now. To test the jam to see if it’s done yet remove your plate from the freezer. Using a teaspoon place a spoonful of Jam onto the plate and then put the plate back into the freezer for 2 minutes exactly. After 2 min. Remove the plate from the freezer. Using the back of your clean fingernail place your finger right next to the jam on the plate. Keeping your finger on the plate scrape your finger, pushing the jam forward, very slowly through the jam. Watch the jam as you move your finger and see if it wrinkles and is thick and forms wrinkles as you move through the jam. If it does your jam is done. If it stays smooth and runny then it needs to cook longer. If it needs to cook longer put your plate back in the freezer and cook your jam another 5 minutes. Take your plate out again and retest the jam. Keep testing and cooking every 5 minutes until your jam wrinkles and is thick as you push it. Rinse the plate before refreezing it if you need a clean spot to test. Once your Jam is ready pour your hot jam into the plastic/glass bowl that has been washed and dried. Let mixture cool to room temperature. About 3-4 hours. When cool enough pour your jam into freezer safe containers. I used “Ball” freezer containers. Don’t fill to the top. Leave about an inch away from the top of the container. Then screw the tops on and it stays fresh without getting freezer burn. This jam will keep in the refridgerator for 1 month and in the freezer for a year.
Now for the great variations I created:
Plum Chutney Jam
Add to Original Recipe after putting mixture into pan:
1 teaspoon (tsp.) Ground Ginger powder
Or 2 tsp. Fresh grated Ginger Root
2 Tbl. Dried Grated Orange Peel
1 Tbl. Ground Cinnamon
1 tsp. Ground Nutmeg
1 tsp. Ground Cardamom
1 tsp. Salt
Plum Pepper Jam
Add the following to original recipe:
1 pound Jalapeños, deseeded
1 additional cup Sugar
1 tsp. Salt
Plum Mixed Berry Jam
Add these ingredients to original recipe:
1 pound frozen mixed berries
1 cup Sugar
1 tsp. Cardamom
Try these and any number of variations you can concoct. If you create a new one tell me and I’ll post your variation, too!
I tell you right now, I made this jam and then made bread while it was cooking and there is NOTHING better than homemade jam and bread right out of the oven. Enjoy and Come and Get It!

Come And Get It!!

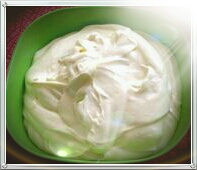
My homemade mayo recipe
MY EASY, YUMMY HOMEMADE MAYO
May I Introduce You To Home Made, Do It Yourself  MAYONNAISE
(Here after referred to as MAYO)?
 
1/2 teaspoon dry mustard powder or Dijon mustard
1/4 teaspoon salt
2 eggs
2 tablespoons white vinegar
2 cups vegetable oil
Make sure your food processor, blender or bowl is completely dry before starting.
In the container of a food processor or blender, combine the mustard powder, salt, eggs and vinegar. Set the food processor on medium speed and gradually drizzle in the oil while it runs. Transfer to a container with a lid and store in the refrigerator for up to two weeks.
 
☆☆☆When adding the oil, gradually means very, very gradually if you want thick mayo. If you like thinner mayo, by all means drizzle faster.
 
Keeps in refridgerator for up to 2 weeks (if it’s not all gone by then).
 
Modifications:
For “Miracle Whip” add 2 Tbl. of sugar. Canola oil makes the mayo less oily tasting AND if you use Olive Oil you have a Heart Healthy version. If you love Black Pepper add 2 tsp. of fresh ground pepper or try a pepper blend. Yum!
 
Once you make your own Mayo believe you me you’ll never buy another bottle of Mayo again!! (Or that “Miracle Whip” stuff I’m not a fan of, sorry.)
 
Now, for those of you who do not own a blender or food processor, the TRUE homemade version.
Place mustard, salt, vinegar and eggs in a medium size plastic or glass bowl. (Metal reacts to vinegar)
Whisk these ingredients together until well blended. Very slowly drizzle oil in while whisking very fast. Whisk until mayo is thick and glossy.

Come And Get It!

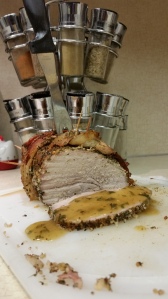
Linda's Divine Pork Roast
Linda’s Divine Pork Roast
This roast is succulent, juicy and oh so flavorful! A great Sunday dinner or anytime family favorite! You can leave off the bacon if you wish but I promise it adds a new dimension of flavor! Serve with gravy and you’re in heaven.
3 lb Pork Tenderloin Roast
2 Tbl. Dried Parsley Flakes
2 Tbl. Dried Rubbed Sage
1 tsp. Paprika
2 Tbl. Dried Minced Garlic
1 Tbl. Cracked Pepper
2 tsp. Kosher Salt
1 Tbl. Seasoning Salt
With Mortar and Pestal grind all dried herbs until coarse and mixed together (or use a bowl and the back of a spoon)
 
1 Tbl. Olive Oil
Message Olive Oil over entire outside of Pork Tenderloin Roast.
 
12 slices raw bacon
 
Take 2 pieces of bacon and place them end to end, slightly overlapping ends in the middle of a 9X12 baking dish that has been sprayed with cooking spray. Using 2 more pieces of bacon make another row end to end, slightly overlapping, to the right of the first row. Repeat with the next 2 slices and place on left side of first row. Using 2 more slices of bacon make another row, overlapping ends, and place this row going side to side in the middle of the first three rows. Repeat with 2 more slices of row bacon and place this row above the last row. Repeat again and place row below the last 2 rows. You should now have 3 rows of bacon going up and down and 3 rows of bacon going side to side.
 
Pour the dried herbs unto a flat dish. Gently roll the oil rubbed Pork tenderloin roast in the dried herbs until the Pork roast is completely covered in the dries herbs. Place the Pork roast in the center of the rows of bacon. Now take the last row of bacon you made and bring the ends around the roast and up to the top of the roast overlapping the ends and secure with a toothpick through the bacon and into the roast about halfway up the toothpick. Repeat with the next row of bacon, securing with a toothpick into the roast. Repeat with all the rows of bacon until all the rows of bacon have been secured with toothpicks. Your Pork tenderloin roast is now wrapped in bacon.
 
1 large onion, sliced, 8 Red Potatoes, cubed and 6 unpeeled Carrots, cut in thirds. Add Vegetables around the roast in baking dish. Drizzle a little olive oil over vegetables. Sprinkle 1 Tbl. dried herb mix over roast and veggies. Bake at 325 degrees for 2 hours or to 165 degrees. Remove from oven and place roast, using 2 spatulas to lift, unto a serving platter.
Using 2 cups chicken broth deglaze bottom of baking dish by scraping all the bits and juices from the roast and vegetables. Place deglazed liquid into a medium sauce pan over med. high heat. Add 1 Tbl. dried herb mixture into liquid. Using 2 Tbl. Cornstarch and 1/4 cup cold water make a slurry by mixing the 2 together. Slowly add slurry to broth while it’s boiling until it thickens into a gravy. Cut roast into 1″ slices. Place Pork tenderloin on dinner plate with a few of the vegetables. Ladle some gravy over the Pork roast and vegetables. Serves 6

Hocus Pocus Jewelry

Halloween Jewelry
Halloween Voodoo Queen earrings. Black turquoise skulls with black crystal beads and silver beads and caps. All seeing eye beads top the crown of her head. Sterling Silver ear wires. $12.00+$2.00 shipping. Go to Madeitmyself@mail.com to request.

Hocus Pocus Jewelry

Halloween Jewelry
So Cute! Amber and Black glass “moons” with silver Halloween owls sitting on top with Amber and Black beads. Silver ear wires. $10.00+$2.00 shipping. Go to Madeitmyself@mail.com to request.